How to Install Prism.js in Grav CMS
Table of Contents
If you are running a website with Grav and want to add syntax highlighting to your posts, one if the easiest ways to do it is with Prism.js. It will take your plain old code blocks and turn them from this:
 <!DOCTYPE html>
<html>
<body>

<h1>My First Heading</h1>
<p>My first paragraph.</p>

</body>
</html>
to this:
 <!DOCTYPE html>
<html>
<body>

<h1>My First Heading</h1>
<p>My first paragraph.</p>

</body>
</html>
If this is what you are looking for, follow the directions below.
Download Prism.js Files
Prism.js offers a wealth of customization options right from its website, making the process of integrating it into your Grav CMS seamless and tailored to your needs.
-
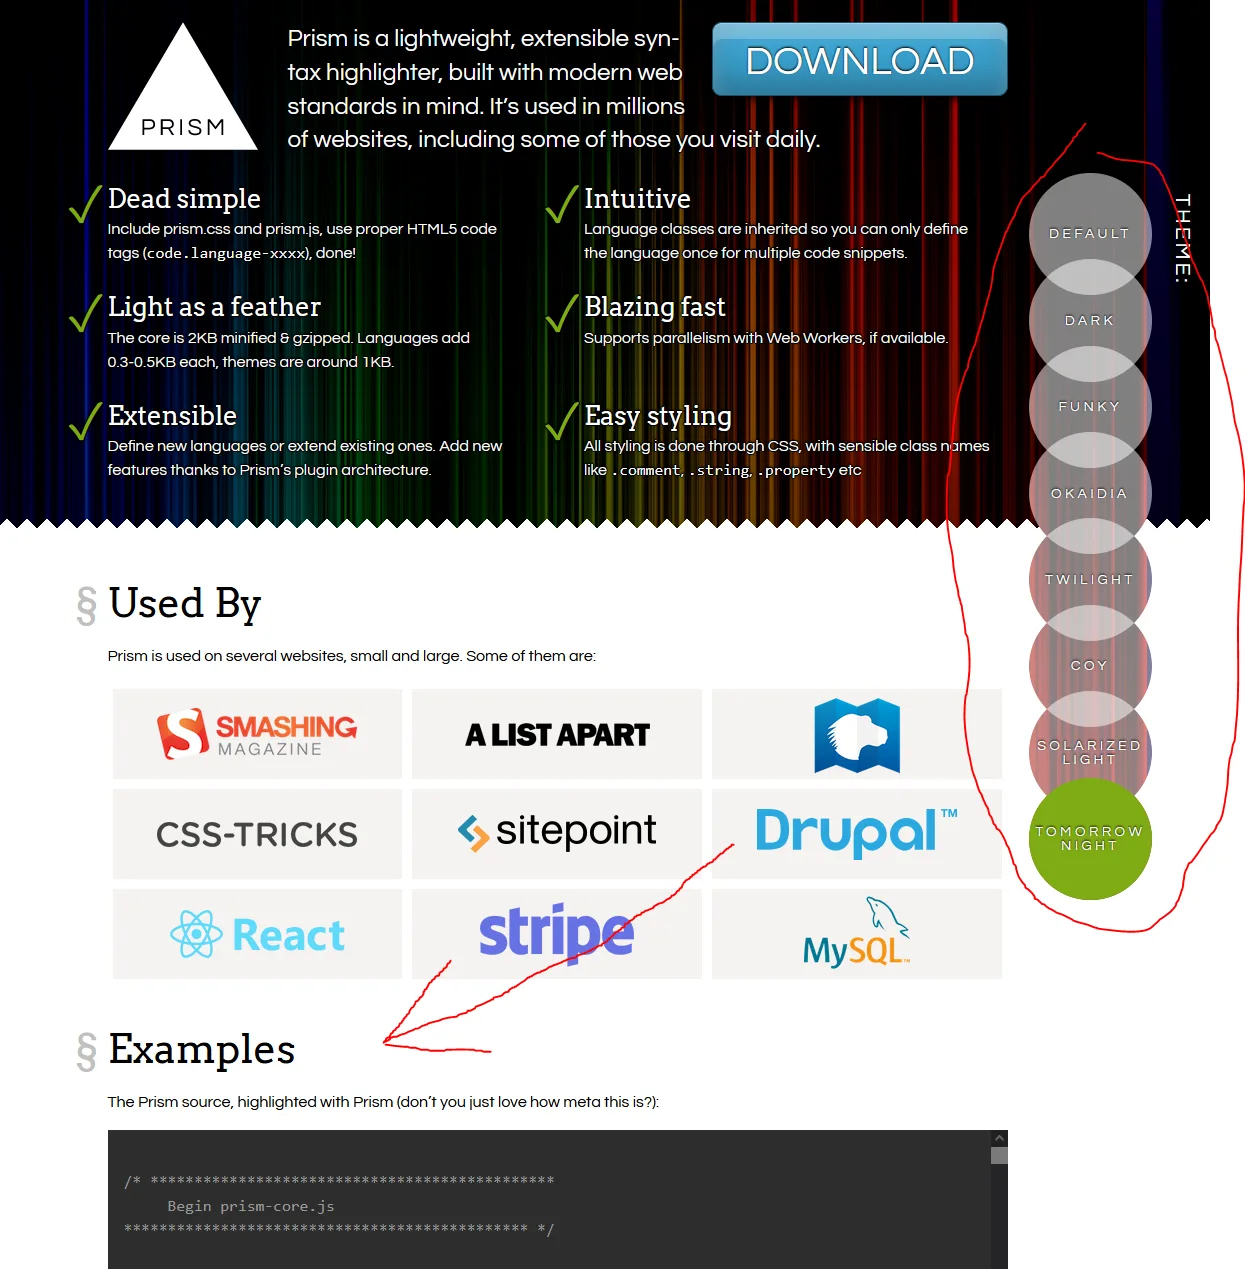
Visit Prism.js Website: First, navigate to Prism.js. You'll be greeted with a well-designed user interface that showcases the capabilities of Prism.js.
-
Choose Your Desired Theme: Prism.js comes with an array of stylish themes that cater to different aesthetic preferences. This determines the base background color and syntax highlighting scheme for your code snippets. On the right side of the website, you'll find a dropdown or selection box which lets you preview and choose the theme that resonates most with your website's design.
-
Customize Your Download: After you've settled on a theme, click on the Download button. Here, you're given the opportunity to optimize your download:
-
Select the Minified Version: This is a compressed version of the code, which uses less space and results in faster load times for your website. This is particularly useful if website performance is important.
-
Choose the Languages: Prism.js supports a plethora of programming languages. Scroll through the list and select the languages relevant to the content you'll be displaying. Remember, the more languages you select, the larger the
.cssand.jsfiles will become. If you’re unsure, start with popular ones like HTML, CSS, JavaScript, and Python, and you can always come back and add more later. -
Consider Additional Plugins: While there are other plugins and extensions available that enhance the functionality of Prism.js, they are outside the purview of this guide.
-
-
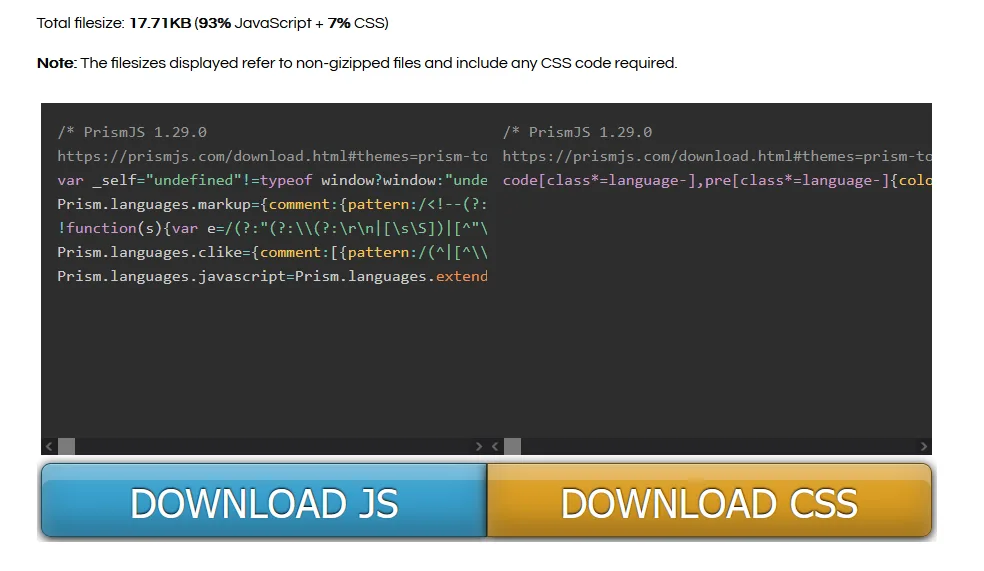
Initiate the Download: Once you've made all your selections, you'll find download buttons for the
cssandjsfiles at the bottom of the page. Click on them to start downloading the necessary files to your device.
Add Files to Grav
After downloading the necessary prism.css and prism.js files from the Prism.js website, it's time to integrate them into Grav. The process is straightforward and can be achieved by following the steps below.
-
Locate Your Grav Root Directory: Before you start, ensure you have access to the root directory of your Grav installation. This is the main folder where all the core files and configurations of your Grav website reside.
-
Navigate to the Themes Folder: Inside the root directory, you'll find the
/user/themes/path. This is where all the themes for your Grav website are stored. -
Access Your Active Child Theme: Within the themes directory, identify the folder named after your active child theme. If you're not sure which one it is, you can typically find this information in the Grav admin panel under 'Themes'.
-
Upload Prism Files:
-
CSS File: Move or upload the
prism.cssfile to the/user/themes/YOUR-CHILD-THEME/css/directory. This is where all the styling files for your theme are stored, and adding the Prism stylesheet here will ensure you can load it with the rest of your theme's styles in the following section. -
JS File: Similarly, move or upload the
prism.jsfile to the/user/themes/YOUR-CHILD-THEME/jsdirectory. This directory contains all the JavaScript files pertinent to your theme.
-
Edit Theme
Once you've added the prism.css and prism.js files, it's time to integrate them into your Grav theme.
Add CSS
-
Locate Your Theme's Base File: To begin, you'll want to open the
base.html.twigfile within your child theme. This file is the backbone of your website's theme and controls the main structural elements. It should be located at/user/themes/YOUR-CHILD-THEME/templates/partials/. -
Insert the Prism CSS: Within this file, search for the
<head>tag, which contains all the CSS file references for your theme. You're looking for a section that starts with{% block stylesheets %}. Here, you'll see several lines of code that add different stylesheets, such as 'widget.css', 'style.css', and so forth. -
Add the Prism CSS Line: Copy the line that adds
custom.cssand paste it just above. Then, rename the copied line toprism.css. It's important to maintain the order because of the cascading nature of stylesheets. Any changes you make incustom.csswill override settings from previous stylesheets, ensuring that your custom styles always take precedence.After this step, your stylesheets block should resemble:
{% block stylesheets %}
    {% do assets.addCss('theme://css/widget.css') %}
    {% do assets.addCss('theme://css/style.css') %}
    {% do assets.addCss('theme://css/content.css', 101) %}
    {% do assets.addCss('theme://css/sidebar.css', 100) %}
    {% do assets.addCss('theme://css/lightbox.css') %}
    {% do assets.addCss('theme://css/prism.css') %}
    {% do assets.addCss('theme://css/custom.css') %}
Add JavaScript
-
Locate the JavaScript Block: Staying within the
base.html.twigfile, find the{% block javascripts %}section. This block contains the JavaScript files that add functionality to your Grav website. -
Insert the Prism JavaScript: Similar to the CSS step, you'll add a line for the
prism.jsfile. Ensure that you place this line in the appropriate order. The order can influence how scripts are executed, so it's important to maintain a logical sequence.After adding the Prism JavaScript, your block should look like:
{% block javascripts %}
    {% do assets.add('jquery',101) %}
    {% do assets.add('theme://js/scripts.js') %}
    {% do assets.add('theme://js/video.js') %}
    {% do assets.add('theme://js/prism.js') %}
Add Language Class in Markdown
When creating content and showcasing code snippets with syntax highlighting, you need to specify the language class in Markdown. This tells Prism.js exactly how to apply the syntax highlighting based on the language you're using.
To do this, you'll use three backticks (```) followed by the language's identifier, right at the beginning of your code block. This small but powerful tweak ensures that the code is rendered with the correct colors and styles that match the programming language syntax.
Here's how it works:
-
Find the Appropriate Language Identifier: Prism supports a variety of languages. To ensure accurate syntax highlighting, you'll need to use the correct identifier for your code's language. A list of supported languages and their respective identifiers can be found on Prism's website here.
-
Insert the Identifier: When you begin a code block in Markdown, you typically use three backticks. Simply append the language identifier immediately after these ticks. For instance, if you're showcasing an HTML snippet, you would start the block with ```html.
-
End with Three Backticks: Conclude your code snippet with another set of three backticks, just as you would with any regular code block in Markdown.
Here's an example using HTML:
```html
 <!DOCTYPE html>
<html>
<body>

<h1>My First Heading</h1>
<p>My first paragraph.</p>

</body>
</html>
Turns into this:
 <!DOCTYPE html>
<html>
<body>

<h1>My First Heading</h1>
<p>My first paragraph.</p>

</body>
</html>
Remember, specifying the correct language identifier is key. It ensures that your code is displayed in the most readable and aesthetically pleasing way possible.
Clear Your Cache
Grav utilizes caching aggressively to enhance website performance. When you make changes, especially ones related to styling and scripts, the cached versions can often stand in the way of seeing those modifications reflected immediately on your site.
To ensure that your recent changes take effect immediately, follow these steps:
-
Grav Admin Panel: If you're using the Grav Admin plugin, navigate to the Dashboard. Here, you'll find a button labeled 'Clear Cache'. Clicking on it will remove all cached content.
-
Command Line: For those more comfortable with the command line, navigate to your Grav root directory and run the following command:
bin/grav clear-cacheThis will accomplish the same task as the admin panel button.
-
Browser Cache: Sometimes after clearing Grav's cache, you might not see the changes. This can be due to your web browser's own caching system. Force-refresh your browser or clear its cache from settings. You can also switch to an incognito browser when working on site changes, negating the need to constantly clear your browser cache.
It's good practice to clear your site's cache regularly or after major updates. This ensures that your visitors always get the freshest content and the latest version.

